Intro to Git
What is Git/Github?
Let’s say you want to save your work on internet to make sure that everything is safe if your computer breaks. Let’s also say you want to share your work with other people. One answer that often comes to mind is to use Dropbox. That’s good, but in the special case where your work is code (in any programming language), it is not the best solution.
For example, you’re trying to develop a feature on Scilpy and your collegue is developping another feature on his own computer. 1) You don’t want to save it constantly, dropbox-style. You only want to add your code once you’re sure it has been correctly tested. 2) If the two of you want to add your features, we need a way to deal with conflicts if you have changed the same files. Git does that. Github, GitLab and Bitbucket are websites offering git as service in a user-friendly way.
You can find many good tutorials on internet, such as this one on the official website. Or check this very nice introduction by Alex from our lab.
Summary of git commands
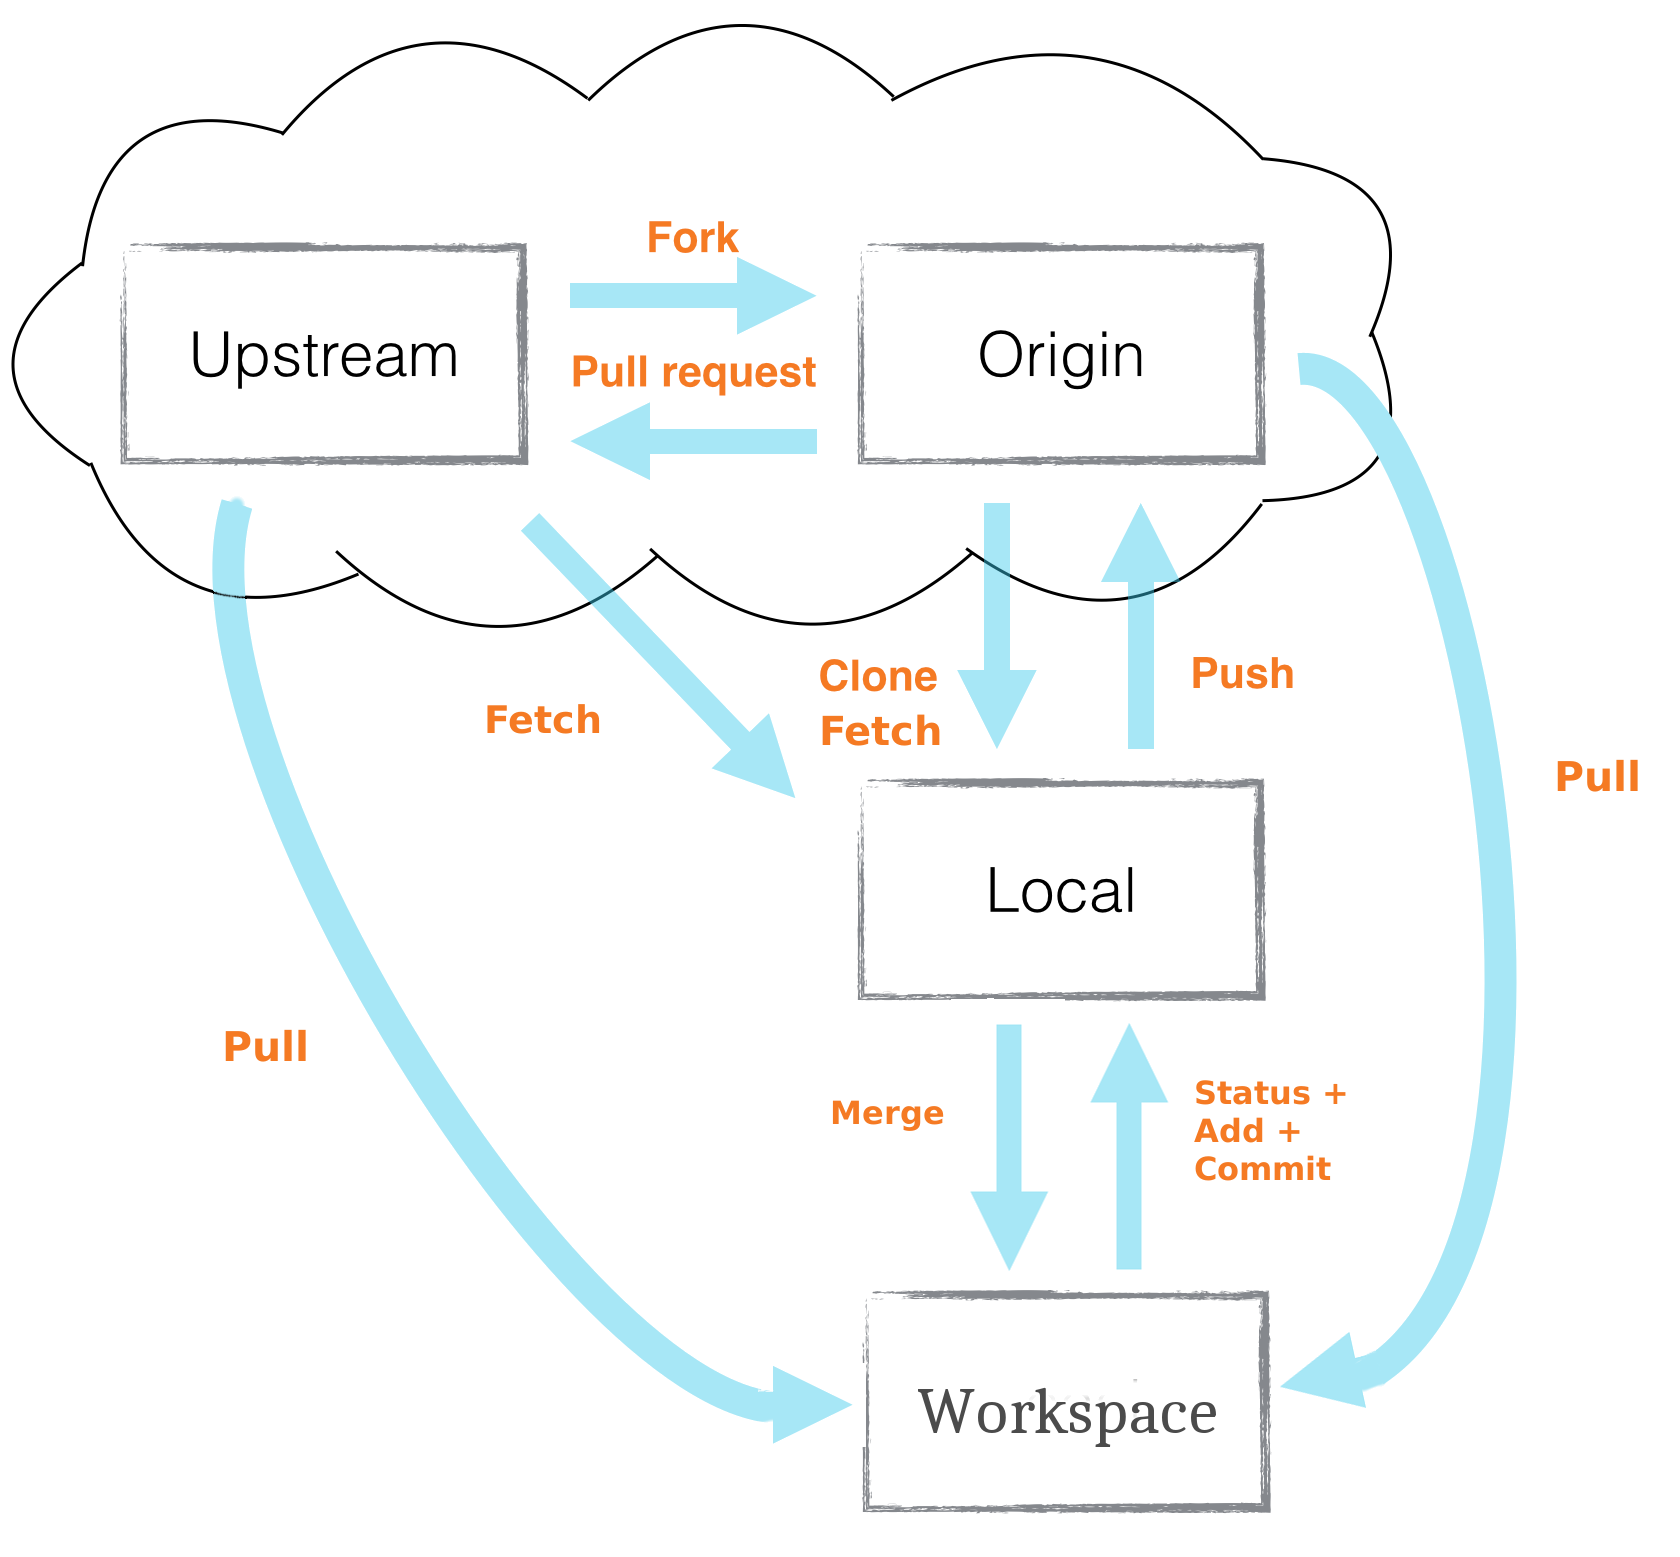
Here is a figure [1] with a summary of the commands that might be useful, but you can google for more information. Every action happening inside the cloud (on internet) isn’t performed in command line, but with buttons on Github. Inversely, every action concerning your local computer is performed in command-line.
- Here a list of one-line summary for Git commands (make sure you find them on Figure 1)
git clone: Create a local copy of a remote repository.git checkout: Switch to a specific branch or commit.git log: Display the commit history in the repository.git status: Show the current state of your working directory, including changes staged, modified, or untracked.git stash: Temporarily save uncommitted changes for later use.git add: Stage changes in your working directory for the next commit.git commit: Record changes made to the repo with a description.git push: Send your local commits to a remote repository.git pull: Retrieve changes from a remote repository and merge them into your current branch.git fetch: Retrieve updates from a remote repository without merging them into your current branch.git merge: Combine the changes from one branch into another.git rebase: Reapply commits from one branch onto another, linearizing history.git remote: Manage the list of remote repositories connected to your local repo.
- Here a list of one-line summary for Git concepts (make sure you find them on Figure 1)
a branch: A parallel line of development in a repository.
a commit: A snapshot of the changes made to a repo, with a unique identifier and message.
master/main: The default primary branch in a Git repository, containing the latest stable version.
origin: The default name for the remote repository from which you cloned.
a fork: A copy of a repository, allowing you to make changes without affecting the original.
upstream: The original repository that a fork is based on, used to track changes from the original.
hash: A unique, fixed-length identifier generated from the content of a commit, ensuring data integrity.
history: The chronological sequence of commits in a repository, representing the evolution of a project.
conflict: A situation that occurs when two or more branches have conflicting changes to the same part of a file, requiring manual resolution.
delta: The difference between two sets of file contents, often used to represent changes between commits or branches.
In Git, your working directory is the local folder containing the current state of your project files. As you make changes to these files, they are tracked by Git but not yet committed (see git status).
The staging area, also known as the index, is an intermediate space where you can organize and prepare the changes you want to include in your next commit (see git add). By adding changes to the staging area, you’re essentially telling Git which changes should be recorded in the upcoming commit (see git commit). Your local repository is the hidden .git folder within your working directory, where Git stores the entire version history, including all commits and branches. It is separate from the working directory, ensuring that your project’s history is preserved even if you make changes or delete files in your working directory.
A remote repository is a version of your project stored on a remote server, allowing for collaboration with other developers. You can push your local commits (see git push) to the remote repository and pull changes made by others (see git pull or git fetch), keeping your project in sync across multiple environments.
Setting up everything the first time
More details specific to Scilpy and how we use Git in the Lab is available here.
# Cloning the code
git clone ${link_to_my_fork}
cd my_fork/

# Telling git who are the upstream and origin
git remote add upstream ${link_to_upstream}
git remote add origin ${link_to_my_fork} # Should be set automatically
git remote -v # To verify everything.

# Creating branches
git branch my_branch_1 # create it
git checkout my_branch_1 # switch on it
git checkout -b my_branch_2 # create AND switch
# Note that here, my_branch_2 would be a copy of my_branch_1.
# If instead you want to start from the master, switch to your master branch first.

# Delete a branch:
git branch -d my_branch # For a local branch
git push origin --delete my_branch # For a branch on origin
Merging branches
Merging branch is a crucial concept in collaborative projects, Figure 3 shows how it affect history [3].
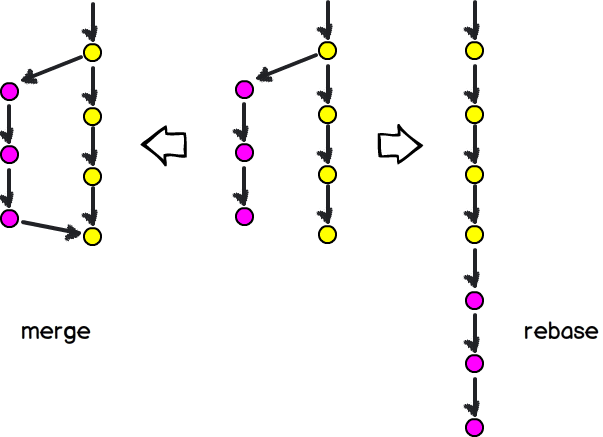
# Technique 1: merge. To merge branch_2 (pink) into branch_1 (yellow):
git checkout branch_1
git merge branch_2

# Technique 2: rebase
git rebase branch_1 branch_2
# P.S. If you then want to push your branch (git push origin branch_2), git won't
# recognize your branch's history and won't allow it. Use:
git push --force origin branch_2
Updating your code
# From the origin to both your local repo and your workspace:
git pull origin master # master or any branch you want to update.
                       # Note that this is equivalent to git fetch + git merge.

# From the upstream to your local repo
git pull upstream master

# From the upstream to your forked repo
# There is no way to do this direclty. You can update your local repo and
# send the update back up to your forked repo
git push origin master

# Updating one branch on your computer with the updates from the master:
# Update master. Then:
git rebase master my_branch
Keeping your code safe
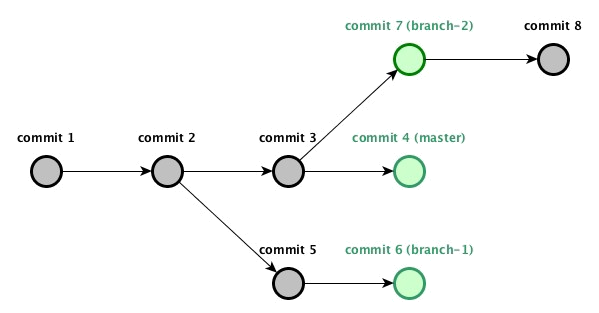
Each update is called a commit. This is shown in the second figure [2].
# From the workspace to your local repo:
git status # To see which files have been modified without telling git
git add my_file  # To add or update a file in git's memory.
git add -u      # To add all files that have been modified, but that git already knew
git status      # If you check again, everything in green will be recorded with the next command:
git commit -m "Message to explain the work I have been doing in this update"

# From the local repo to your forked repo
git push origin my_branch  # Will automatically send it to the same branch name in your forked repo.

# From your forked repo to the upstream repo:
# Use the Pull Request button on internet

# From your local repo to the upstream repo:
# DON'T DO THAT. Didn't you see that there is no such arrow on Figure 1!